This tutorial will show you how to set up a simple health bar. It covers how health bars work, but doesn't explain how to cause an object to loose health (perhaps someone could add that bit to the end). The tutorial is mostly geared towards beginners.
Setting Up the Plane[]
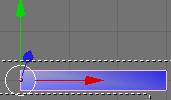
The first and most important thing for a health bar is to know how to setup the plane. First set up the bar as shown below. Notice that the center of the bar is all the way to the left. This is so that when we scale the bar down, it'll only move the right side of it towards the left (which is how energy/health bars look when they're being depleted).
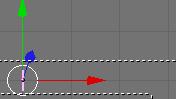
Since it's much easier to do this in a scale of 1-100 life. (Assuming here you know the basics of blender, if not you should really learn the basics first). Increase the frame to 101. Select the bar, then press i and select size. So now in frame 101, the bar will be set to that size. Next go all the way back down to frame 1, scale the bar down all the way down like shown in the picture.
Once it's scaled down, press i again and select size. So now when we're at frame 1, this will be the size of the bar.
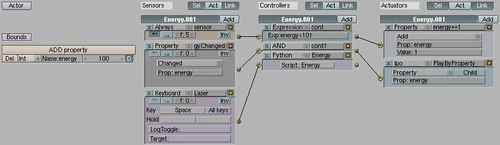
The Logic Brick Setup[]
Now we're ready for some logic bricks. Take a look down here:
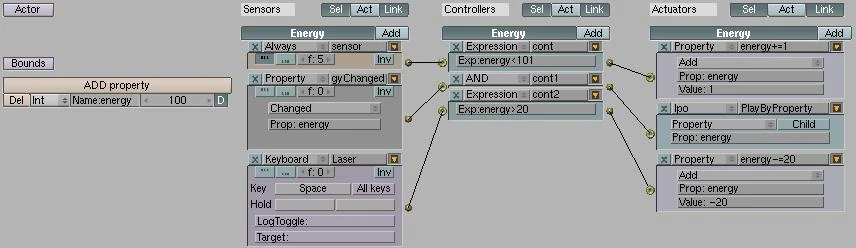
Notice the property energy set to 100, this will be the initial value of the energy bar (starts at full).
Taking a look at the 1st part of the logic bricks:

This first setup is to always add 1 to the property energy.
- Where there is a f:5 in the always sensor, that's to slow down the speed at which the pulse fires. So a higher number in this case would slow down the rate at which energy replenishes at.
- The expression controller here has energy<101, so we'll only be adding 1 to the property energy only if it's less than 101. This is so that we don't count over giving the player more life than he should have.

The 2nd line of logic bricks is to play the energy bar by property. Looking at the actuator brick (right most one), we're playing the energy bar IPO by property. Remember we had setup the sizes of the bar from 1-101 before, this is where it comes into play. Setting it up this way whenever the property 'energy' changes, it will trigger and play the ipo of the bar displaying the player's current energy state.

Here's where you'll have to do some thinking and see how this will connect with your project. This last line of logic bricks just triggers the energy bar to take off 20 energy points after pressing space. Due to the nature of logic bricks currently, it'll fire twice so instead of taking off 20 points, it'll take off 40 points instead. Don't worry, python can solve that problem.
The Python Solution[]
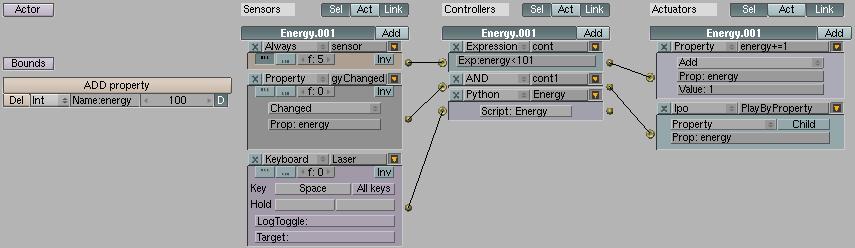
As you can see in this Python solution, everything is exactly the same except for the 3rd line of logic bricks. Here we replace the controller with a Python script (we also don't need the property actuator anymore).

Taking a look here, there's nothing interesting to see. The real thing behind all of this is the script...
---------------------------------------------------------------------------------
import GameLogic as g
c = g.getCurrentController()
o = c.getOwner()

shoot = c.getSensor("Laser")

if shoot.isPositive() and o.energy > 20:
	o.energy -= 20
---------------------------------------------------------------------------------
Since the logic bricks fire two kinds of pulses, positive and negative, it unfortunately fires twice and triggers our property to decrement by twice the amount (unwanted result). So with python we read in the sensor to trigger it and only check to see if a positive pulse was fired. If a positive pulse fires, then we decrement the "energy" property by 20. It's that simple. The and o.energy >20: is only there so that we only take 20 energy points off, when energy is actually greater than 20. We don't want the player to have negative energy points.
The health bar setup is very much the same. Take a look at it yourself in the example blend. Well this is all you need to start creating your own energy/health bars.
Have fun!
|
The original version of this tutorial came from Mind Innovations and was written by goldentaiji. Permission to include this tutorial in the GameBlender 4 Ever wiki under the GFDL license was granted by the author. |