No edit summary |
|||
| Line 1: | Line 1: | ||
| − | {{Under Construction}} |
||
==Particle Smoke== |
==Particle Smoke== |
||
===General=== |
===General=== |
||
| − | '''Requirement:''' This tutorial is based on the [[Particlefire|Particles Fire]] tutorial. Alternative [Particleflame|Particles |
+ | '''Requirement:''' This tutorial is based on the [[Particlefire|Particles Fire]] tutorial. Alternative [[Particleflame|Particles Flame]] can be used. |
'''User level:''' Normal |
'''User level:''' Normal |
||
| Line 16: | Line 15: | ||
===Preparation=== |
===Preparation=== |
||
| − | *Follow the |
+ | *Follow the [[Particlefire|Particles Fire]] or [[Particleflame|Particles Flame]] tutorial. |
*Create the texture with any paint program. Name it '''Particle_alpha.tga'''. It requires an alpha channel. You can use following channels to compose the texture: |
*Create the texture with any paint program. Name it '''Particle_alpha.tga'''. It requires an alpha channel. You can use following channels to compose the texture: |
||
| − | :[[Image:Particle_alpha.png]]The RGB map is plain black. |
+ | :[[Image:Particle_alpha.png]] - The RGB map is plain black. |
| − | :[[Image:Particle_basic.png]]The Alpha map is visible in the |
+ | :[[Image:Particle_basic.png]] - The Alpha map is visible in the center fading out to the border. |
*As black smoke is difficult to see on black background go to shading<nowiki><F5></nowiki> -> world buttons and change the background color to a medium color (not white). |
*As black smoke is difficult to see on black background go to shading<nowiki><F5></nowiki> -> world buttons and change the background color to a medium color (not white). |
||
[[Image:Tut_part_smoke_background.png]] |
[[Image:Tut_part_smoke_background.png]] |
||
| Line 50: | Line 49: | ||
*Open the image '''Particle_alpha.tga''' from the preparation |
*Open the image '''Particle_alpha.tga''' from the preparation |
||
[[Image:Tut_part_smoke_particle_UV.png]] |
[[Image:Tut_part_smoke_particle_UV.png]] |
||
| − | |||
| − | ...to be continued... |
||
===The Emitter === |
===The Emitter === |
||
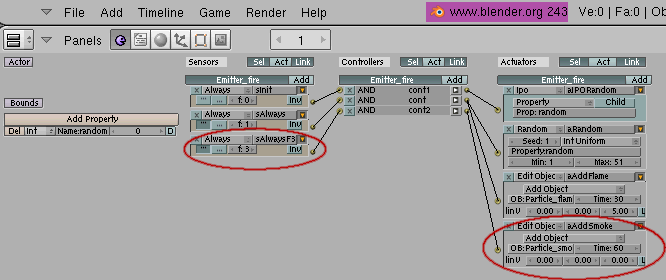
| + | *Now it is time to add the smoke to the fire. Go to layer one and select the Emitter_fire |
||
| − | ...to be continued... |
||
| + | *Display the logic buttons <nowiki><F4></nowiki>. |
||
| + | *Add another always sensor. As we do not need so much smoke the sensor should fire with a frequency of 3. |
||
| + | *Connect this sensor to a new AND controller. |
||
| + | *Connect this controller with a new Edit Object actuator with Add Object "Particle_smoke", Time 60. The smoke will stay twice as long as the flames. |
||
| + | [[Image:Tut_part_smoke_emitter_logic.png]] |
||
| + | |||
| + | *Now it is tme to enjoy the result. |
||
| + | [[Image:Tut_part_smoke_result.jpg]] |
||
| + | |||
===Remarks=== |
===Remarks=== |
||
| + | *The density of the smoke can be controlled with the ColA IPO curve or with the frequency of the triggering always sensor. |
||
| − | ...to be continued... |
||
| + | *The shape of the smoke can be controlled with the ScaleY and ScaleZ IPO curves. |
||
| + | *The lenght/speed direction of the smoke is conrolled by the Particle_smoke motion actuator |
||
| + | |||
| + | *Think about environment - Reduce polution! |
||
Revision as of 14:31, 13 March 2007
Particle Smoke
General
Requirement: This tutorial is based on the Particles Fire tutorial. Alternative Particles Flame can be used.
User level: Normal
Blender version: 2.43
Results: Smoke and Fire

The flame particle will be copied and modified to simulate smoke via an alpha texture.
Preparation
- Follow the Particles Fire or Particles Flame tutorial.
- Create the texture with any paint program. Name it Particle_alpha.tga. It requires an alpha channel. You can use following channels to compose the texture:
 - The RGB map is plain black.
 - The Alpha map is visible in the center fading out to the border.
- As black smoke is difficult to see on black background go to shading<F5> -> world buttons and change the background color to a medium color (not white).

The Particle
- In layer two make a copy of Particle_fire name it Particle_smoke
- Move Particle_smoke to layer three <m> or move it away from Particle_fire
- Display the IPO curve Editor and make the IPO curve single user copy. This ensures we have separate IPO curves for smoke and fire.

- The logic can remain as it already is.
- Rename the IPO curve to Particle_smoke.
- Remove the IPO curves ColR, ColG, ColB.
- Change the IPO curves ScaleY, ScaleZ and add ColA as shown below:

- Use this guide to set the control points:
| Channel | 1 | 2 |
| ScaleY | (0.0,0.6) | (30.0,2.0) |
| ScaleZ | (0.0,0.6) | (30.0,2.0) |
| ColA | (0.0,0.0) | (30.0,0.0) |
- Go into the UV Face select mode <f>.
- Enable the Alpha button.
- Open the UV/Image Editor.
- Open the image Particle_alpha.tga from the preparation

The Emitter
- Now it is time to add the smoke to the fire. Go to layer one and select the Emitter_fire
- Display the logic buttons <F4>.
- Add another always sensor. As we do not need so much smoke the sensor should fire with a frequency of 3.
- Connect this sensor to a new AND controller.
- Connect this controller with a new Edit Object actuator with Add Object "Particle_smoke", Time 60. The smoke will stay twice as long as the flames.
- Now it is tme to enjoy the result.
Remarks
- The density of the smoke can be controlled with the ColA IPO curve or with the frequency of the triggering always sensor.
- The shape of the smoke can be controlled with the ScaleY and ScaleZ IPO curves.
- The lenght/speed direction of the smoke is conrolled by the Particle_smoke motion actuator
- Think about environment - Reduce polution!